Create a charming, rustic lantern using recycled cans
Introduction
A DIY punched tin can lantern is a charming and eco-friendly project that turns ordinary cans into decorative lighting. Whether for indoors or outdoors, it’s easy, affordable, and beautiful. A punched tin can lantern is an easy and rewarding DIY project that transforms everyday waste into atmospheric decor. Whether you want to add a cozy glow to your garden, patio, or living room, this craft is simple, inexpensive, and beginner-friendly.
This tutorial guides you step by step in making your own lantern using just a tin can and basic tools. It’s the perfect blend of function, style, and sustainability.
According to Treehugger, reusing metal cans in crafts reduces waste and supports creative reuse practices.
Why Use Recycled Cans for Lanterns
Tin cans are strong, heat-safe, and easy to work with, making them ideal for handmade lanterns. Instead of throwing them away, repurposing these cans reduces waste and adds character to your home.
Benefits include:
- Reuses common household items
- Safe to use with real or LED candles
- Customizable for any theme or event
- Suitable for both indoor and outdoor decor
Materials You Will Need
To get started, gather these items:
- Empty tin can (soup or vegetable size)
- Hammer and nail or metal punch
- Towel or cloth (for stability)
- Water and freezer (optional)
- Marker or masking tape
- Tea light candle or LED light
- Spray paint or acrylic paint (optional)
Step-by-Step Instructions
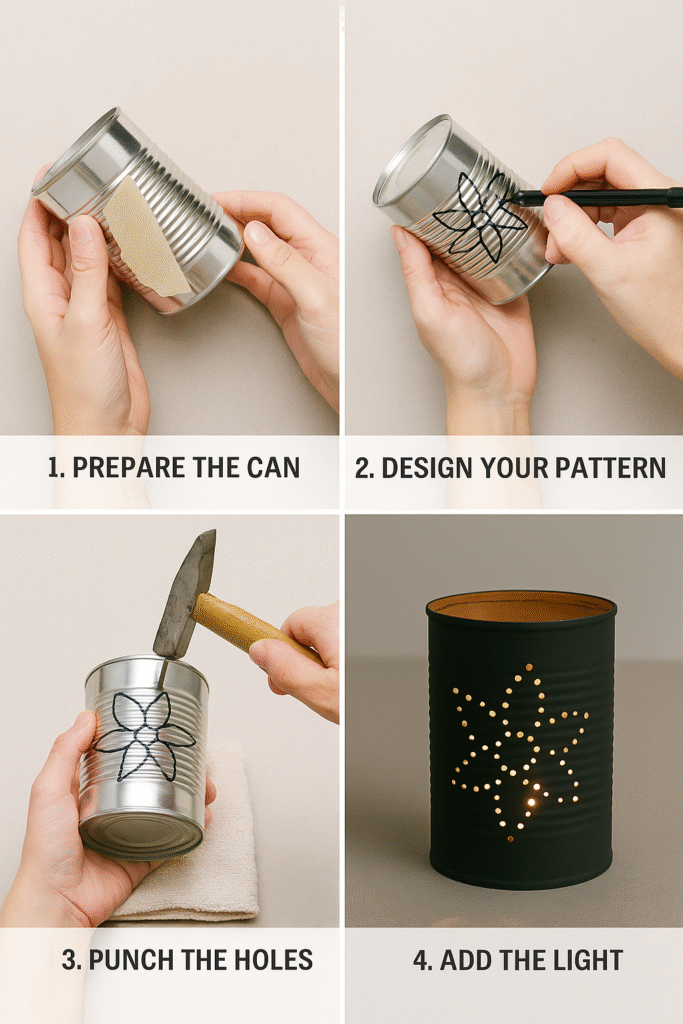
1. Prepare the Can
Clean the can thoroughly and remove the label. For easier punching, fill the can with water and freeze it for several hours. The ice provides a solid surface to prevent bending while you make the holes.
2. Design Your Pattern
Use a marker or tape to outline a design. Simple geometric shapes, stars, or floral patterns work well. You can also wrap paper around the can and draw directly on that as a guide.
3. Punch the Holes
Place the frozen can on a towel to keep it steady. Use a hammer and nail or metal punch to create holes along the lines of your design. Keep holes spaced evenly for better visual effect.
4. Paint the Can (Optional)
Once the holes are done, let the ice melt and dry the can. You can paint it in any color to match your decor. Metallics like gold, bronze, or matte black offer a classic lantern look.
5. Add the Light
Place a tea light or LED candle inside the can. When lit, the light will shine through the punched holes, projecting beautiful patterns onto nearby surfaces.
Creative Design Tips
- Use different nail sizes to create varied hole diameters
- Wrap twine or rope around the top for a rustic touch
- Add a wire handle for hanging
- Group multiple lanterns for a stronger visual effect
Where to Use Your Lanterns
- Outdoor patios or balconies
- Indoor shelves or windowsills
- Event decorations like weddings or parties
- Pathway lighting for gardens or yards
Safety Notes
- If using real candles, never leave them unattended
- Ensure cans are stable and not hot to the touch when moving
- Keep away from flammable materials
For more eco-friendly lighting ideas, check out our https://toptipshub.com/recycled-can-cutlery-holder/
Conclusion
A punched tin can lantern is a simple yet elegant project that recycles what you already have and turns it into something useful and beautiful. It’s a creative way to practice sustainability while adding charm to your home or outdoor space. With just a little effort, you can create a warm, inviting glow that reflects your personal style.
[…] Looking for more sustainable kitchen ideas? Don’t miss our guide on https://toptipshub.com/diy-punched-tin-can-lantern/ […]